Magical Creatures Everywhere Part 3
Introduction
Hello everyone, welcome to Part 3 of our Walkthrough for Magical Creatures Everywhere Adventure of Harry Potter Hogwarts Mystery. Last time, you helped retrieve some of the missing creatures, including Puffskeins, Fire Crab, Crups, and Bowtruckles. It was a great success, but some of the creatures are still on the loose, so your job’s not over yet.
Now you need to go and gather some supplies for Madam Pomfrey. When you are ready, proceed to the Potions Classroom.
Summary
Part 3 Summary:
- Task 1: Meet Snape
- Location: Potions Classroom
- Requirements: 1 hour – 5/5 stars
- Choice: Tell Professor Snape why he should give you more of his supplies
- Injured students need your help: +5 Knowledge
- It’s what Dumbledore wants.: +5 Courage
- You’re a generous person (19 Empathy): +10 Empathy
- Task 2: Meet Madame Pomfrey
- Location: Hospital Wing
- Requirements: 3 hours – 1/5 stars
- Choice: Tell Profesor Kettleburn what magical creature you need to capture next
- Streeler
- Hippogriff
- You should rest: +5 House Points
- Task 3: Help Rowan
- Location: Your House’s Common Room
- Requirements: 3 hours – 5/5 stars
- Task 4: Meet Merula
- Location: Training Grounds
- Requirements (Duel): 22 Courage, Empathy, and Knowledge; 300 Coins
- Choice: Decide if you’ll report Merula to Dumbledore
- Tell Dumbledore what Merula did (19 Courage): +10 Courage
- Don’t tell anyone what Merula did: +5 Empathy
- Part 3 Rewards: 5 Gems
Walkthrough
Video guides are available at our YouTube channel. Use the button below.
[Disclaimer: This walkthrough will feature the gameplay from the perspective of a Year 4 student. Since the adventure is available for students of Year 4 and above, the star and attribute requirements for certain tasks might be different for you, depending on your current progress of the main story.]
Upon arriving, you’ll notice the speech bubbles above some of your classmates. Tap on those if you are curious to see what they have to say.
Unfortunately, you will have to attend the Potions Class before you can get the ingredients.

This is an hour-long task requiring you to earn five stars to pass. Because of that, avoid starting the task with an empty energy bar.

There is a bonus progress action tied to Professor Snape. Prioritize it if you want to save a bit of energy.

After you are done, Snape will give you only a few supplies. You have the option to ask him for more, but you’ll need a good reason in order for him to give those to you. If you go with the third option, he will spare an additional Wiggenweld Potion.

For the next task, you should proceed to the Hospital Wing to bring those supplies to Madam Pomfrey.
Upon arriving, you’ll notice the speech bubbles above some of the characters. Tap on those if you are curious to see what they have to say.
Madam Pomfrey will tell you that Professor Kettleburn got injured while trying to catch some of the creatures, so you’ll need to tend to him.


To complete this task, you need to earn five stars within three hours. One star is required to pass.

Since only one star is needed, you might want to consider starting earning it and then letting the task expire. This way, you will save some energy, which will allow you to start the next task with a full energy bar.
However, if you are looking to earn some additional rewards and a chance for Chocolate Frogs, it is recommended to fully complete this task. An action with bonus progress is tied to Madam Pomfrey.

When you are done, Professor Kettleburn will ask which creature you need to capture next. You have three options to respond with. You should definitely consider picking the third option since that one will grant you five House Points.

You’ll then get the task to meet Rowan in the Common Room. Proceed there when you are ready.
You’ll find that a Streeler somehow got inside your Common Room and the two of you have to think of a way to safely move it.
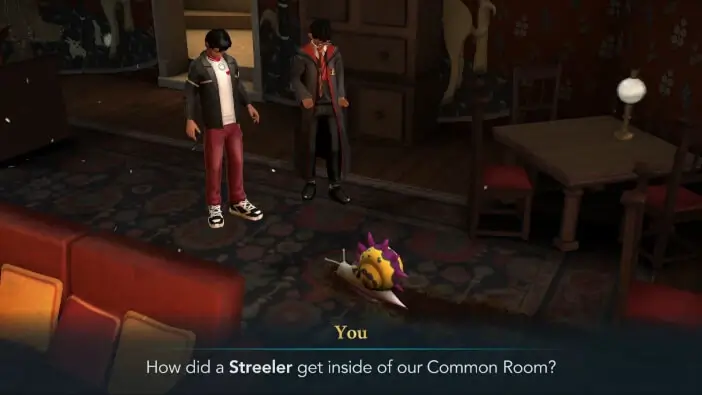
Thankfully, your friend will come up with an interesting idea – you can keep the Streeler busy while Rowan fetches the Dragon-hide gloves from Herbology.

Distracting the Streeler is a three-hour task with the passing requirement of five stars. Because of this, it is highly recommended to avoid having an empty energy bar before starting it.

The only bonus progress action for this task is tied to the Streeler, so you want to complete it as often as possible to save some energy.

After you are done, Rowan will show up with the Dragon-hide gloves and thank you for distracting the Streeler.

However, before you are able to proceed to the next task, there will be a waiting period of five hours. Since you will likely be low on energy at this point, it is recommended to wait until this timer runs out. That way, your energy should recharge in the meantime.

Once you are able to continue, head to the Training Grounds to meet Merula.
Upon arriving you’ll notice a gigantic Niffler standing near her, surrounded by fascinated students. You can interact with some of them by tapping on their speech bubbles.
Apparently, Merula is the one responsible for this. She got the idea from Barnaby’s dream and she successfully managed to enlarge the Niffler to gigantic proportions.

This, however, can go wrong on so many levels. This massive Niffler could do horrendous damage to the castle the moment it spots something glittery, which is why you have to shrink it down. Sadly, Merula won’t like this idea and she’ll forcibly try to stop you from ruining her plan.

The only way to stop her is to beat her in a duel. Tapping on the crossed wands icon will open the task window.

It will display the recommended attribute levels and the cost of each attempt.

There are a few things to keep in mind when it comes to this duel. If either of your Courage or Empathy is at least three levels higher than the recommended number, you can easily win the duel in two turns by going Sneaky and using Flipendo (in case of Courage) or by going Aggressive and using Depulso (in case of Empathy).
However, if you rushed through the main story, and if your attribute levels are close to recommended ones, there are some other strategies you can use to win the duel. You can go Aggressive during the first turn and use Incendio. If you get the burn effect, you can go Aggressive or Sneaky during the second turn and use Depulso or Flipendo.
However, if you get stunned or if you don’t get a burn effect, you might end up losing the duel. Alternatively, you can just go Aggressive or Sneaky and use Depulso or Flipendo on every turn. While neither of these strategies is always going to work, they will significantly increase your chances of winning.

Once you defeat Merula, you’ll be able to see the genuine sadness in her eyes.

Now is the time to cast the Shrinking Charm and bring Niffler back to its original size.

Once you do that, Merula will threaten to get Hagrid into trouble if you report what she did. You have two options to respond with. If you like Merula, it is recommended to pick the second option. Otherwise, feel free to go with either one.

This will conclude Part 3 of Magical Creatures Everywhere adventure. Hit the Collect button to claim your reward. You will receive 5 Gems.
There are only a few more creatures to catch. However, the most dangerous of them all is still on the loose. But which one is it? And will you be able to safely retrieve it? Find out in the fourth and final Part of this amazing adventure!
Thank you for reading.