Scary Horror Escape
Complete Walkthrough
Hello everyone and welcome to our Scary Horror Escape Walkthrough. We’ve gone through the gameplay in detail and we will present all we learned about this game from our experience in this complete guide through the puzzling, scary atmosphere that awaits us.
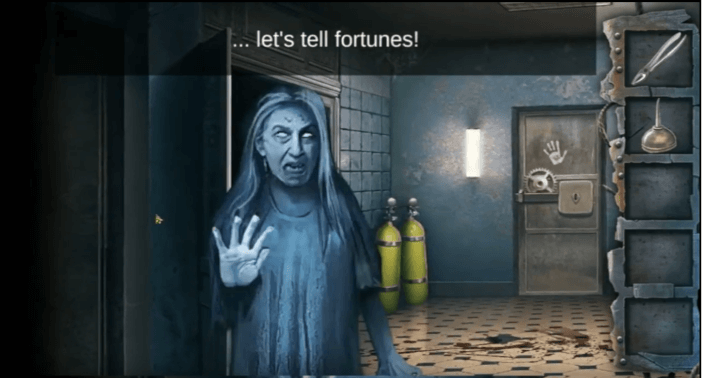
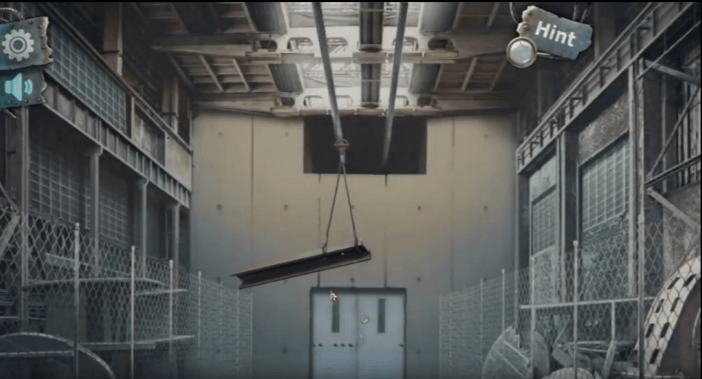
Although this title is technically in the adventure genre, people have been calling this type of games – Escape games. And, this is the creepiest, scariest of all as it turns out to be and they us know right at the start. Trust me, this isn’t a bluff…

The introduction to this, what is for me at the time an upcoming labyrinth of madness and brain grinding, reminds me somewhat of a horror version of The Matrix and that blue pill/red pill question…
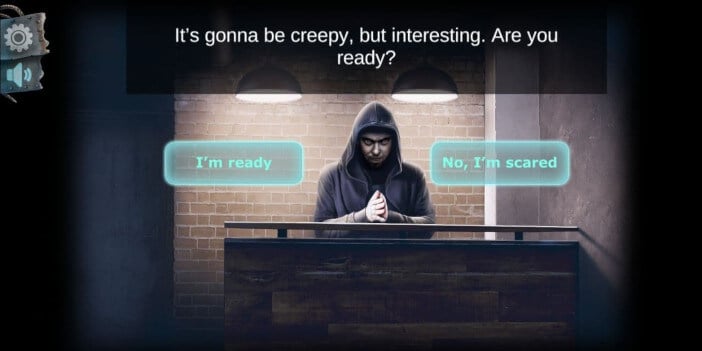
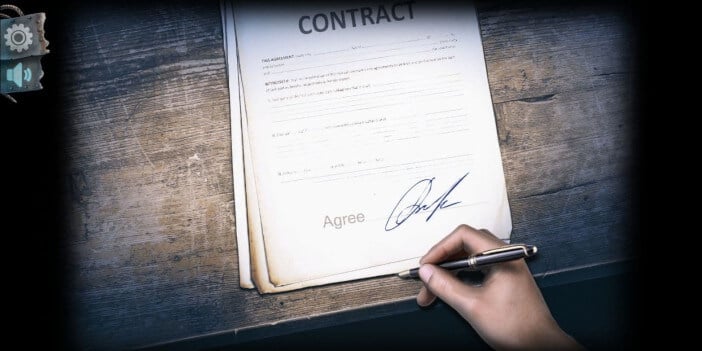
To make matters worse, you are literally offered a contract to sign, switching the responsibility from the game to yourself for any psychological or other damages you may endure while playing. This is an in-game gimmick of course, but still they took the trouble to make it creepy right from the start. The signature won’t even happen only by tapping, you need to tap and hold while the hand slowly moves to sign, as if doing it invulentarily…
Is this game already messing with my mind???
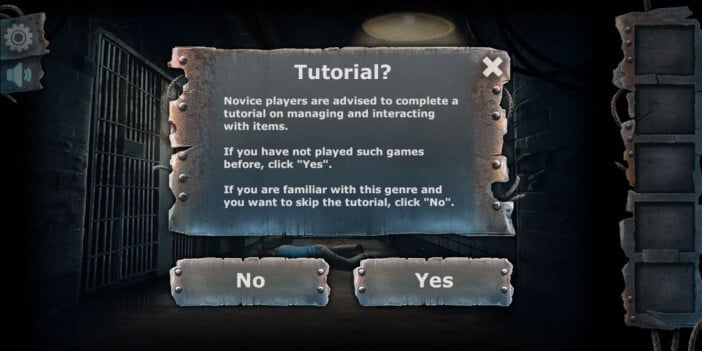
Okay, tutorial stage! Finally something a little light hearted and cool. I highly recommend you go through it, even though you’ve played these escape games before and you are quite familiar with the mechanics. You never know if Scary Horror Escape has some mechanic unique to its gameplay and tutorials usually award some starting in-game goods, so it can’t hurt.
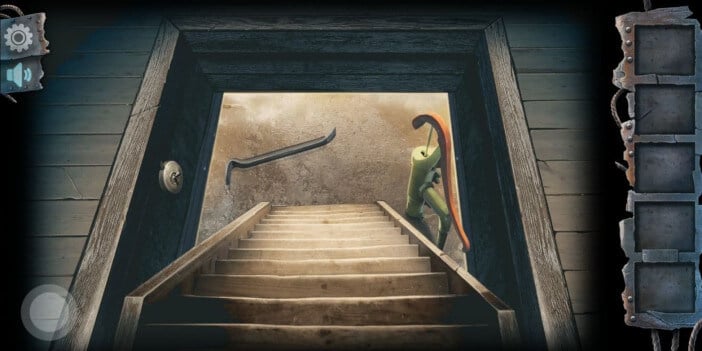
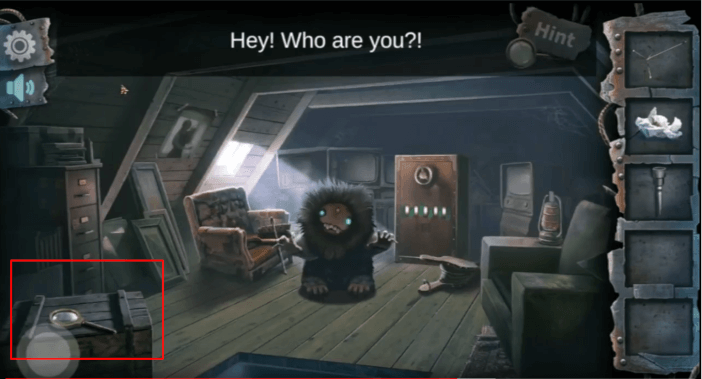
Room 1
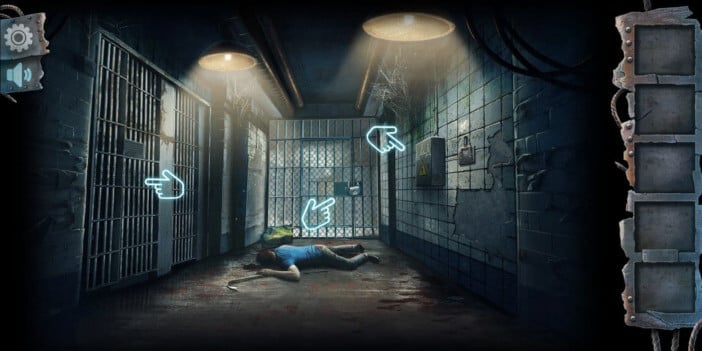
While we’ve on the topic of movies and reminiscence, this first tutorial scene resembles a lot like you’ve guessed it – The Saw. The will introduce you to the basic mechanics. You try to pick up something behind locked prison bars, your hand can’t fit, so you need something to bend the bars. You then tap the crowbar, swipe across the bars with it equipped, and voila. A lot of things will function like this in the game.
Um… if you try to take the bear also, the supposedly dead hand clutches it… I’ll just leave this here…

Okay, I’m at my first serious puzzle and I don’t know what to do. I need to take a hint, which means watching a 10-second advert. Not too terrible. The mathematical puzzle is a simple one, but still… I’m a bit rusty in this section. If mathematics is often going to be a part of the puzzle obsticles, then this game really is true horror. They were not joking!

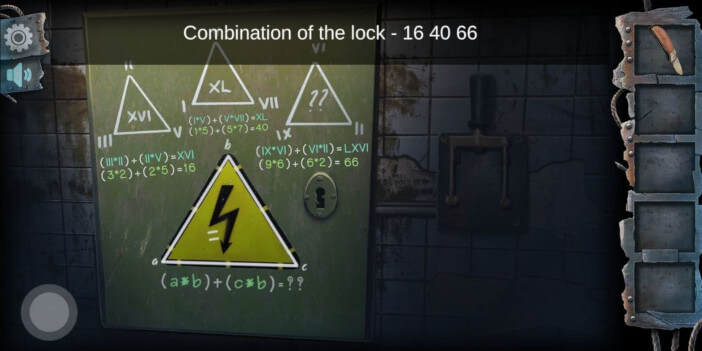
The last two numbers in the lock combination are 66, so the whole combination is:
16 40 66
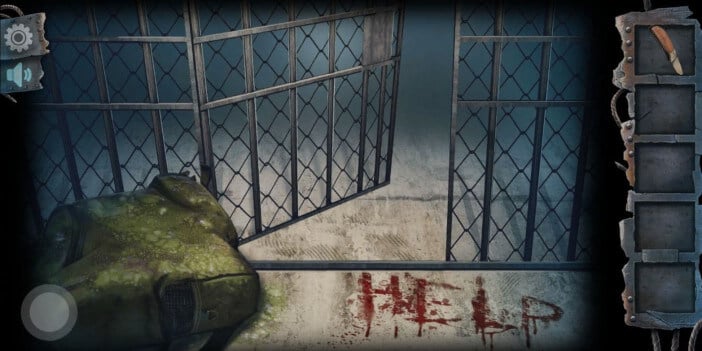
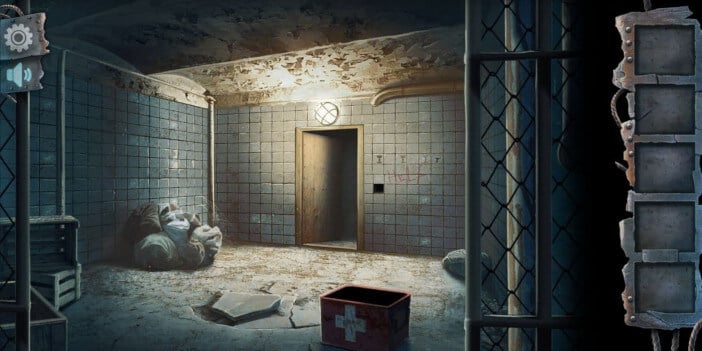
After you open the gate, the first thing you will notice is, of course, the bloody inscription saying “Hell”. But, besides that, you will see a green backpack on the ground next to the now opened gate. To open the backpack, we will use our knife, so just tap the knife and tap the backpack. However, you can’t touch it with your own hands, so you need to go to the other room and find something appropriate for the occasion.
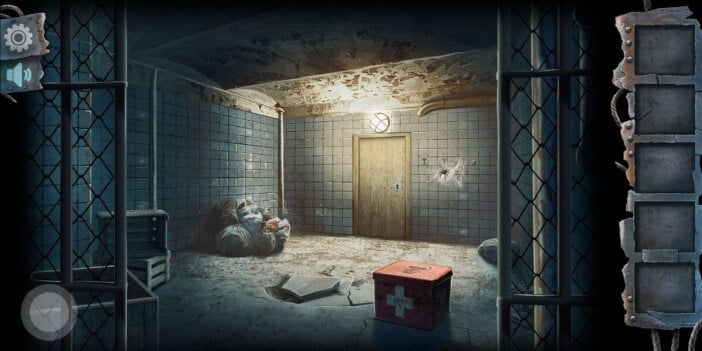
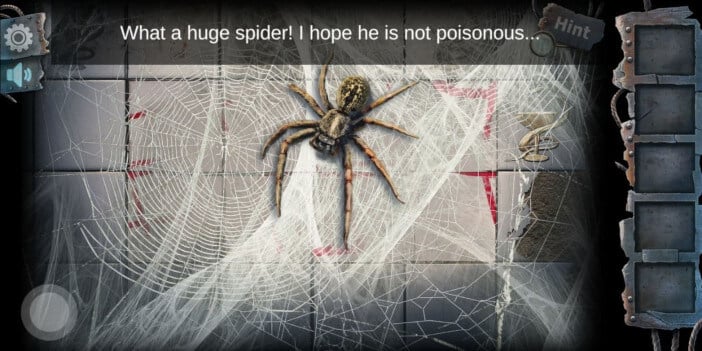
After you go through the door, there will be a First Aid metal box waiting for you, with a slot matching the Staff of Hermes on its lid, which is locked. You need to find the Staff of Hermes plate, and it is located behind the spider and his web. There is also garbage there in the other corner, but first open the box.
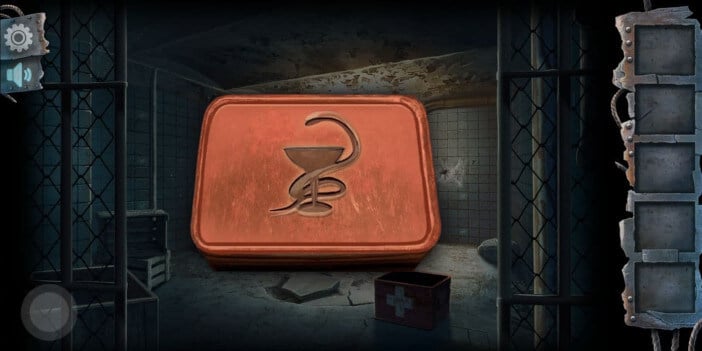
When you open it, you will find an acid vial inside, which you will use to burn off the worms and disinfect the garbage, before you rummage through it. Just tap on the garbage, then tap the vial, than garbage again and watch the show.
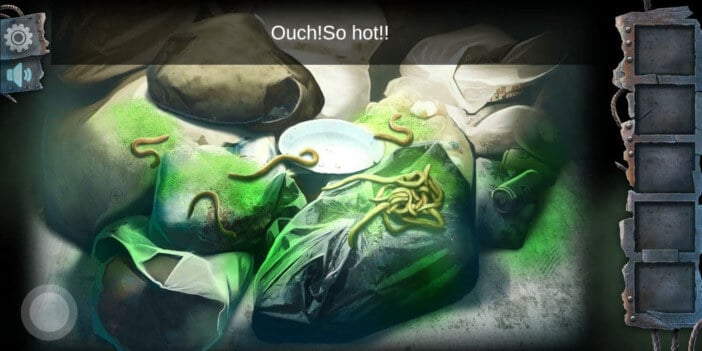
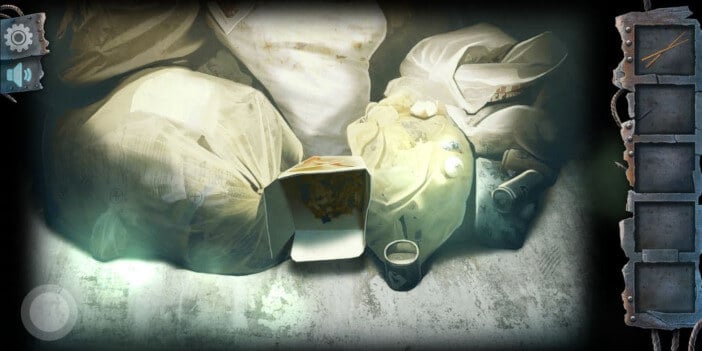
After you’ve gotten rid of worms, you can rummage through the garbage by tapping anywhere on it. After a few taps, a leftover Chinese food box will be revealed, with some chopsticks in it. Take the chopsticks.
Now, you can get back to the screen with the gate and the backpack you have cut open with your knife earlier. The chopsticks are going to help you with getting the lighter out from it, and that’s it. You are to use the lighter to burn off the spider and his web, right where you found the Staff of Hermes plate. After burning it, it will reveal a puzzle under it.
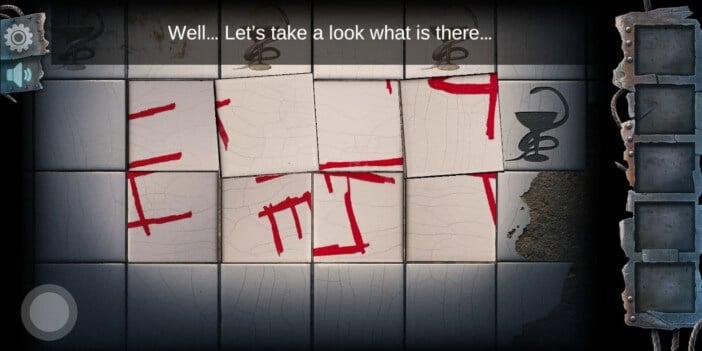
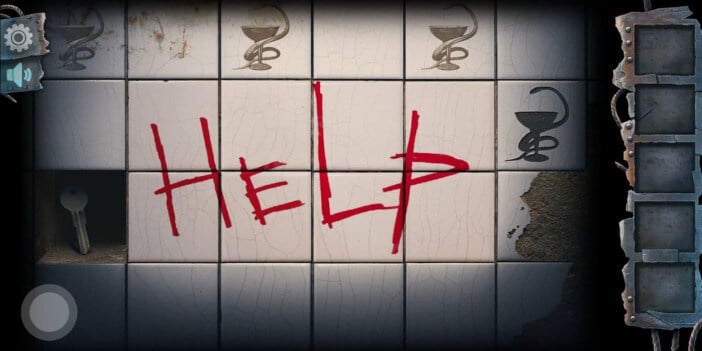
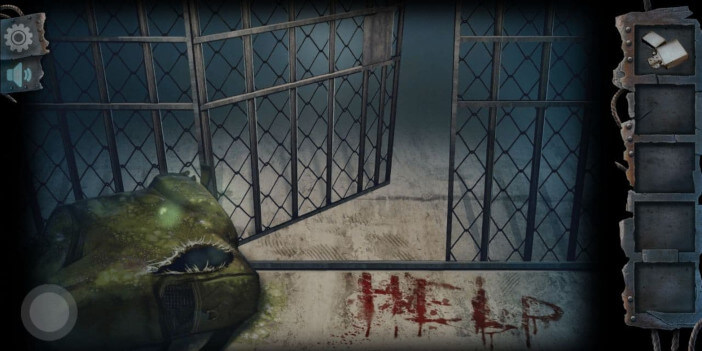
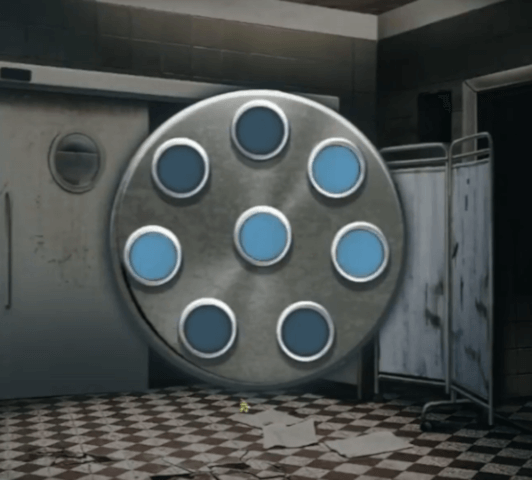
The tile puzzle is solved easily. By tapping the tiles, they will rotate clockwise until you reach the right position. When alligned correctly, theu will say: “Help”, probably written in either lipstick or blood… Also, by alligning them, 1 tile will fall off and reveal a key you need.
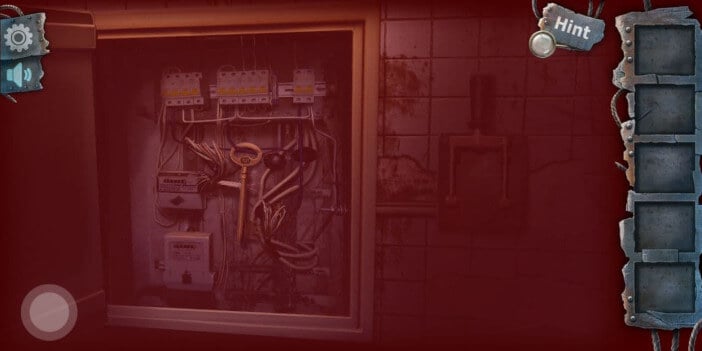
The key is for the electric box in the first room, but bee careful after you unlock it not to touch it for it is active and it will hurt you.
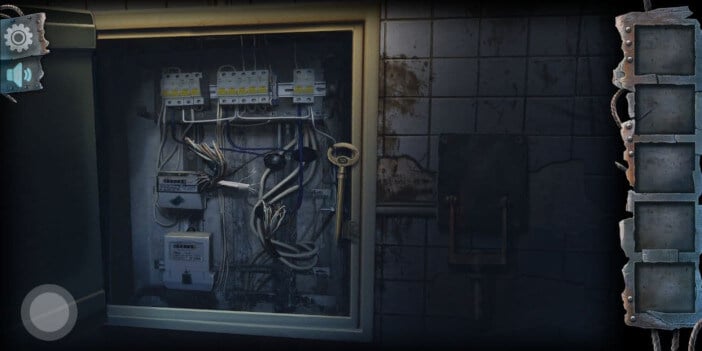
First you must tap the lever on the right side of the electricity box and turn of the power. Then you can loot the key and go on to exit to the next stage of the tutorial.
Room 2
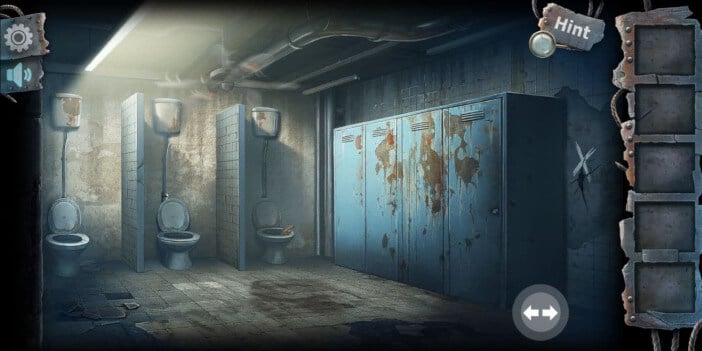
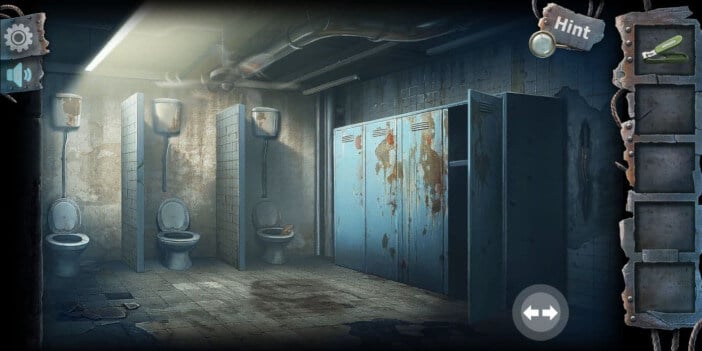
The key you looted fits the lock and after you’ve opened the door, you will find yourself in the toilet with some lockers. The toilet is, of course, in a rather charming condition. If you look closely, there is even a human hand sticking out of one toilet, the one on the far right… Thank God the fan is working.
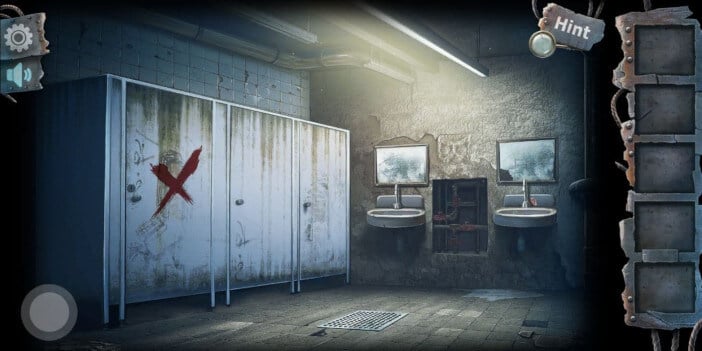
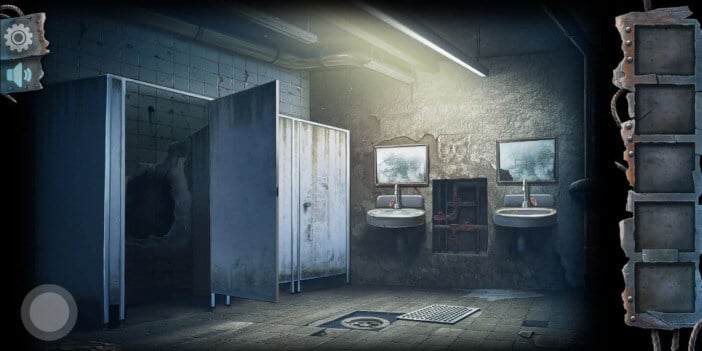
On the other side of the toilet is where we find the cabins and two sinks with mirors, and some piles with visible valves sticking out of the wall. Be careful when you go to the sink…
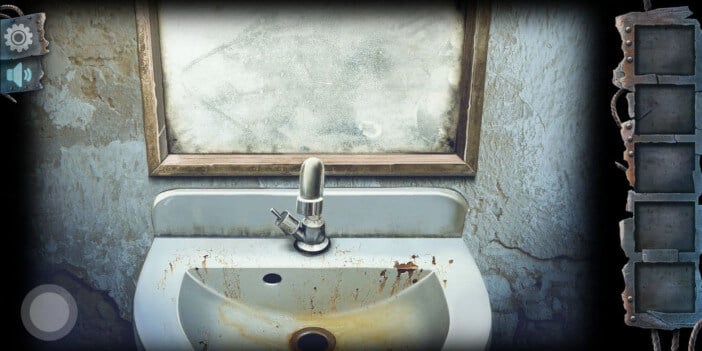
I told you, be careful when you go to the sink! I hope that reflection was as pleasant for you as it was for me…
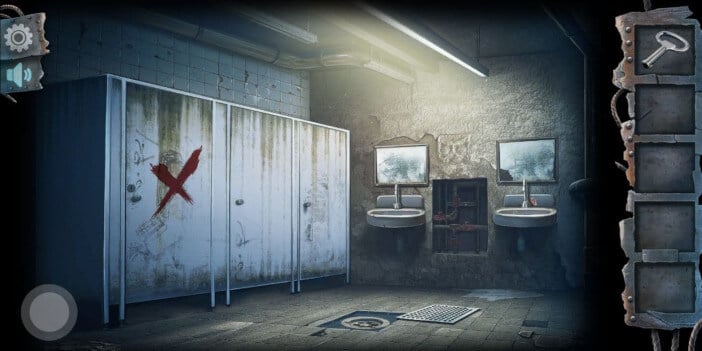
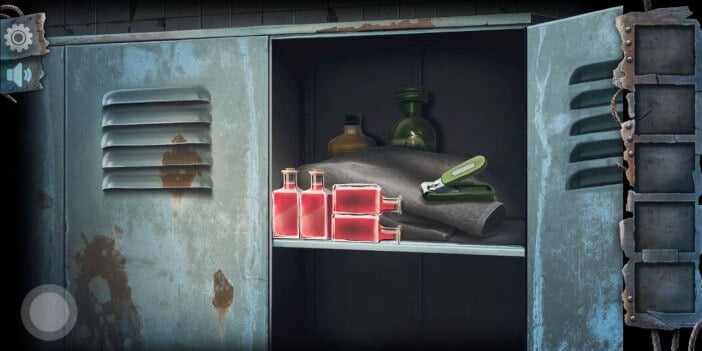
When you are looking at the sinks and the cabins, in this screen displayed up, you can tap the drain opening on the floor of the toilet. Removing the metal lid wil lreveal a key located under. That key is for the far right locker, in the other toilet screen. In it you will find lots of things. You can pick up the nail clipper, but you can’t touch the blood yet as it may be the key to this whole thing…
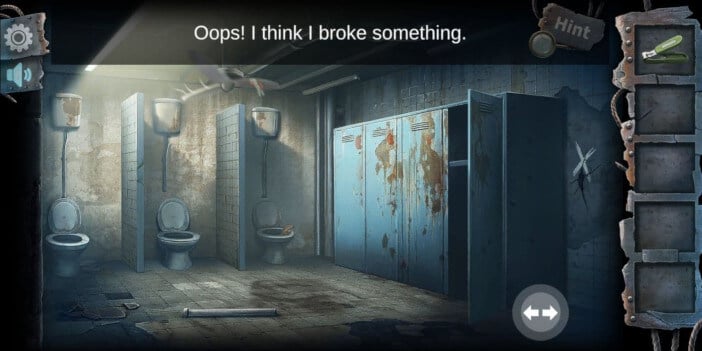
When looking at the toilets beside the lockers, you can tap the middle one to loosen one pipe and loot it. The pipe is then used to break the wall behind the lockers, market with a white X.
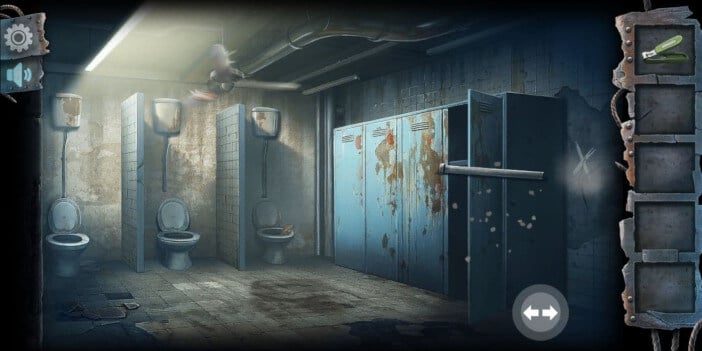
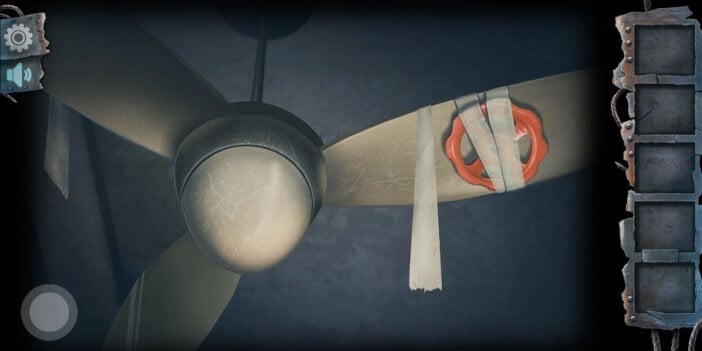
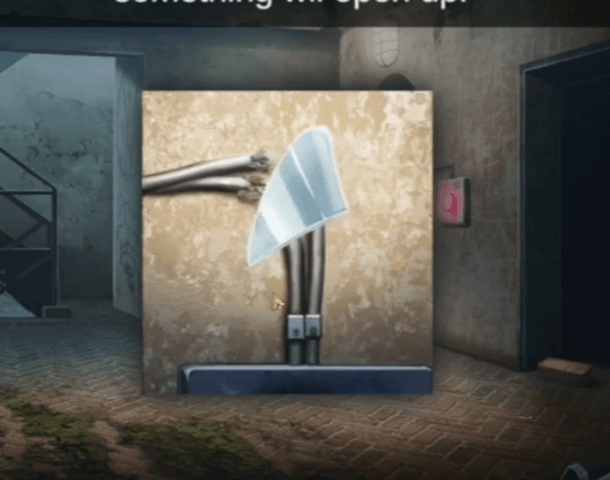
The wall crack will show some exposed live wiring, which can be cut by using the nail clipper. Once you cut the wires, the fan on the ceeling will stop spinning. You can then tap the middle toilet which will close up and move under the fan, so you can climb and take the valve part taped to it.

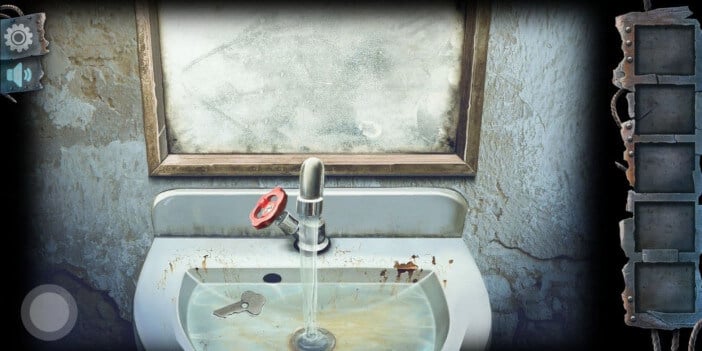
The valve part is obviously for the sink, the one with the scary reflection, so go there and use it. To open the watter though. You will need to set the valves on the pipes accordingly, and the hint are the four blood jars. The top and the left one are to be vercital, while the right and the bottom one are to be horizontal. This will enable you open the water, and once you do it will wash up a key. Remember to turn the water off.


Room 3
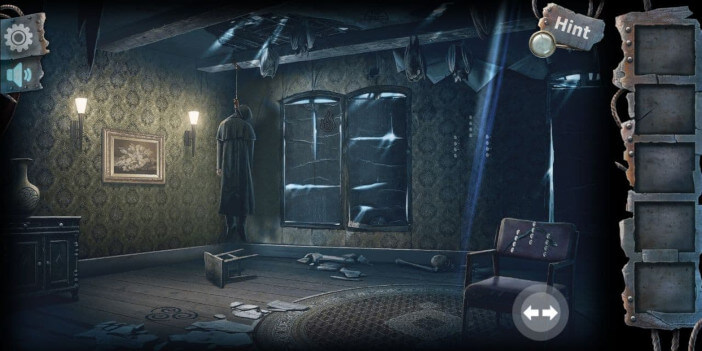
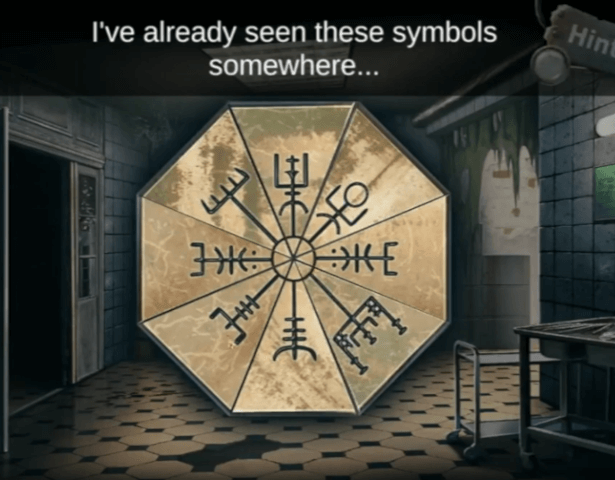
The key is for the toilet cabin marked with a red X. It has a big hole in it, which leads to a new room, again split in two parts. Both parts have many details, among which the hanging man is perhaps the first one you will notice…
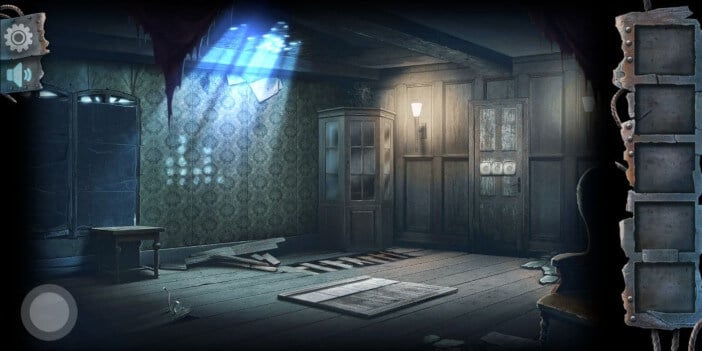
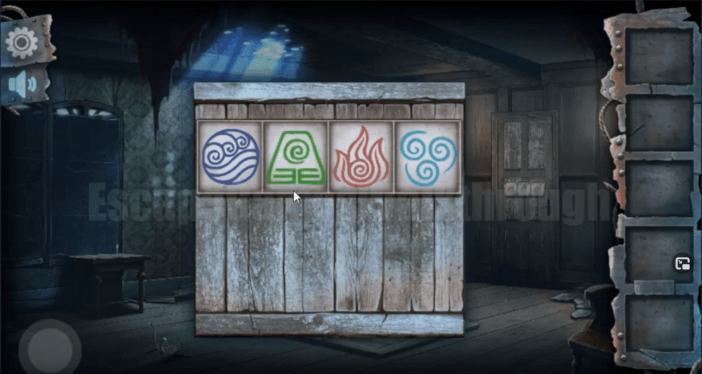
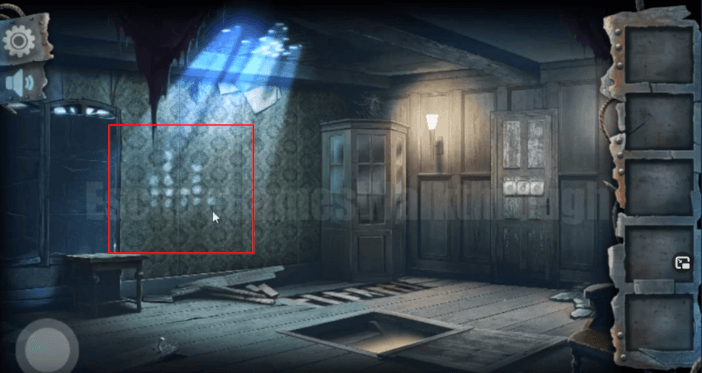
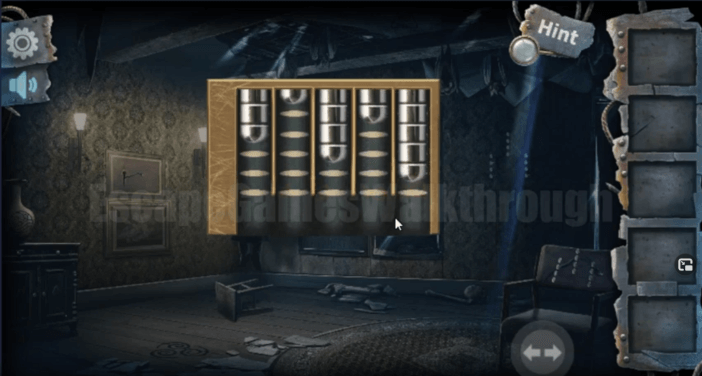
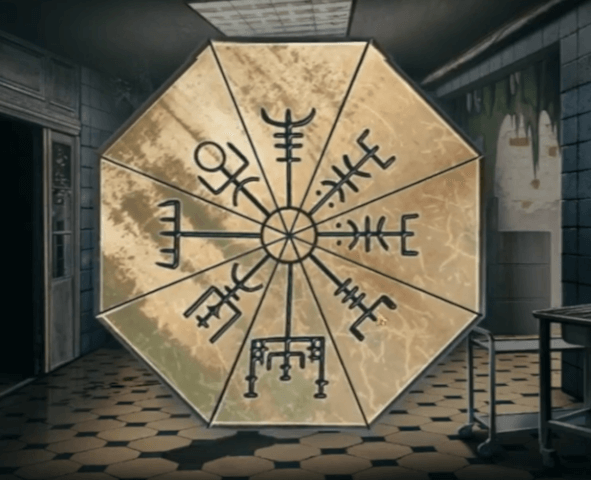
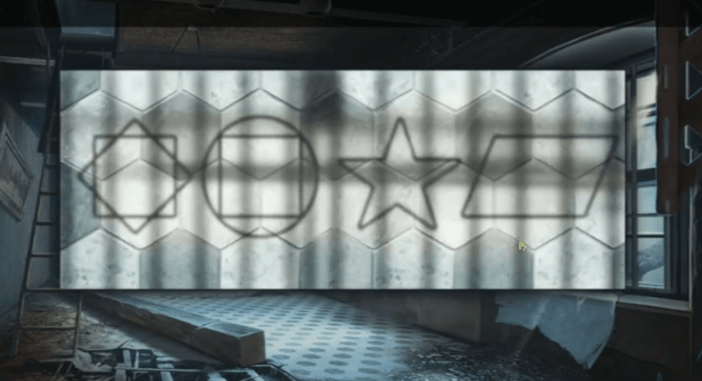
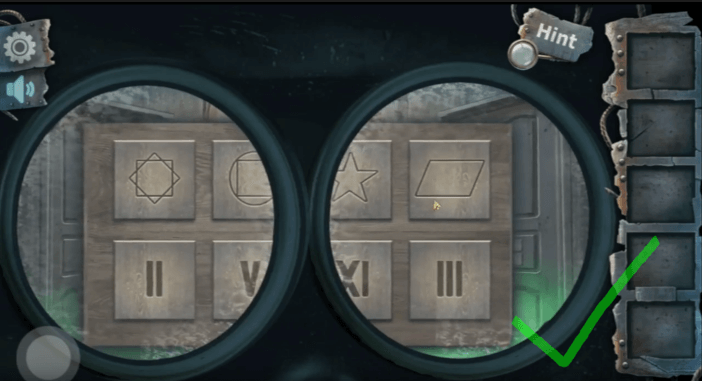
You will notice wooden boards on the floor of the right side of the room. It is the door to the basement and when you tap on it, they hold a combination puzzle to open. The correct symbols can be found in various parts of both rooms, like on the vase, on the window, the ceeling, etc… You can look them up for yourself, or just copy the symbols as presented below:
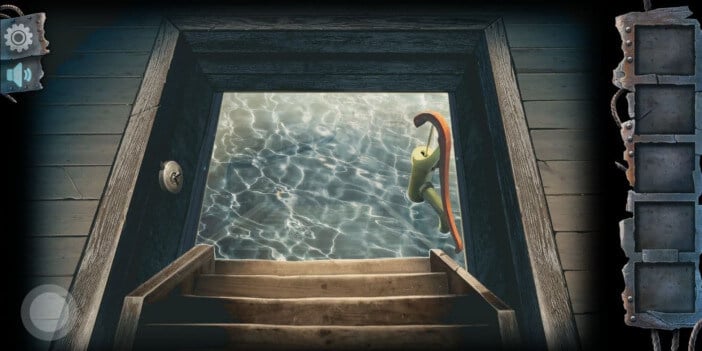
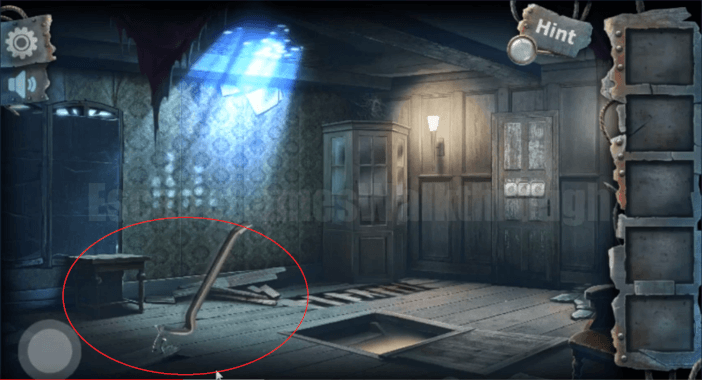
Once you open the basement door, you will see that it is flooded. Turn off the light and start pumping the water out. Just a few taps will do it. It will reveal a crowbar for you to loot for later use.
Use the crowbar to pick up one of the nails that is sticking out of a loose floorboard, just beside the basement entrance.
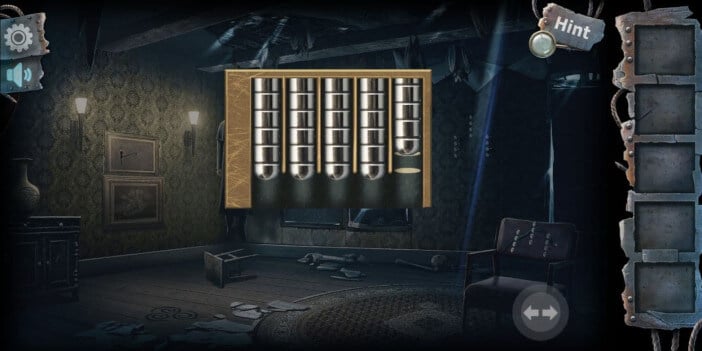
Once you have your nail, you can use it to lockpick the safe, located behind the painting in the part of the room where the man is hanging from the ceeling. It will open the lock machanism screen and the hint for the locks is actually on the wall in the other part of the room, where the light from the holes on the roof reaches the wall. But, if you don’t want to mess around ,here it is solved.
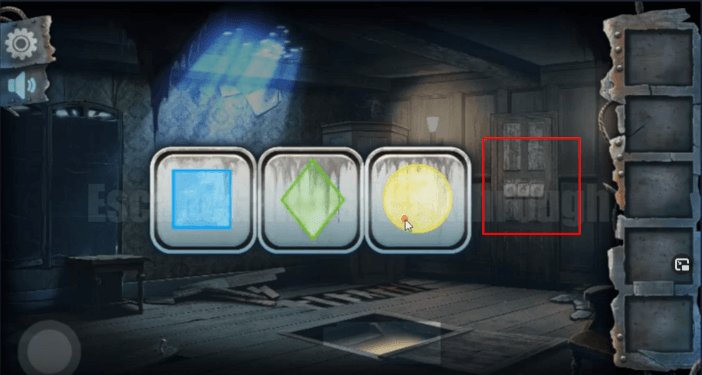
When the safe opens, you will loot a necklase, which is to be used on the button pattern on the wall, right behind the chair with the nails in the back support pannel. After you place the necklase, just pull it down, so it gets into the right position where the light from a hole in the roof passes througth the diamonds in just the right pattern, giving you a hint on how to arrange the patterns on the door in the right side of the room.


This will open the doors and get you to the next stage of the tutorial, the ambulance room.
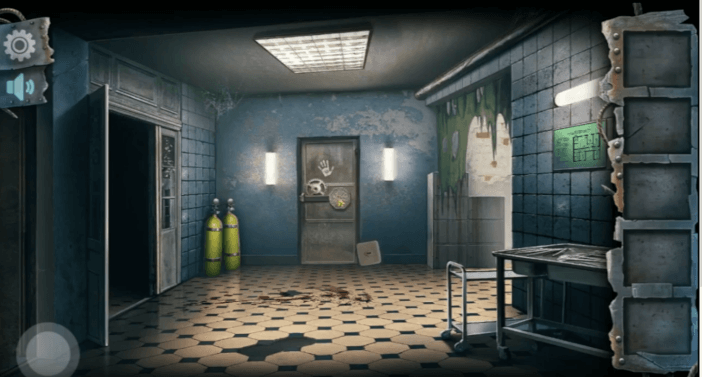
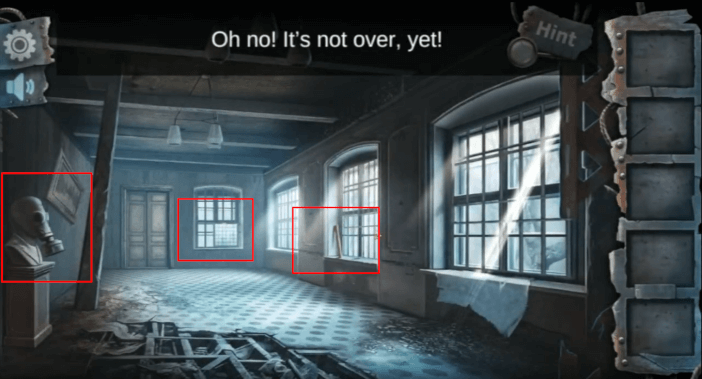
Room 4
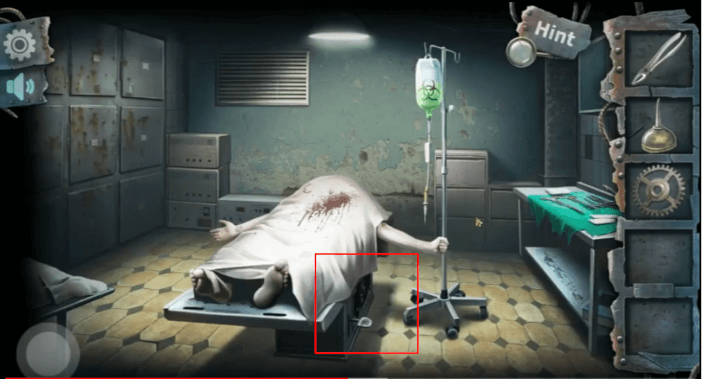
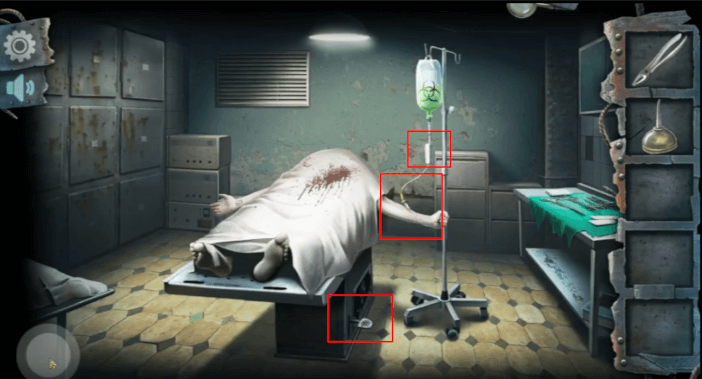
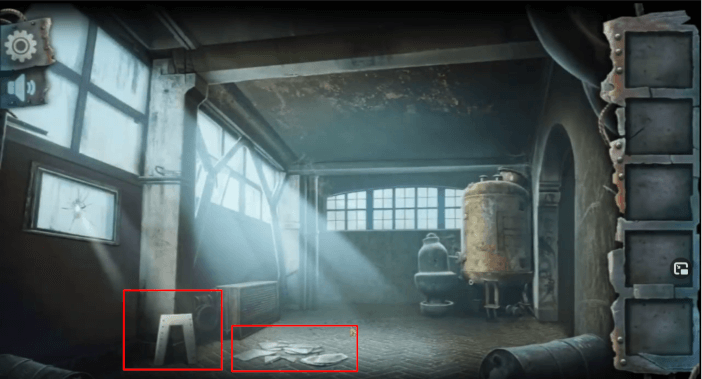
We again have two sides to the room and a few charming additions, like the dead body on the table. The room is also filled with all kinds of broken medical things, files, broken glass ,papers, etc… lastly, the light in it is dim, so the entire thing ads to the whole atmosphere of Scary Horror Escape.
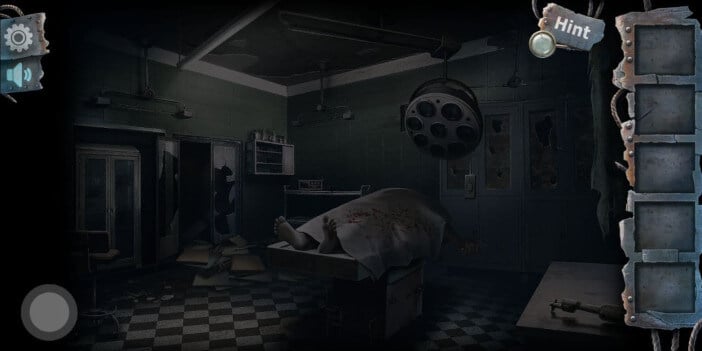

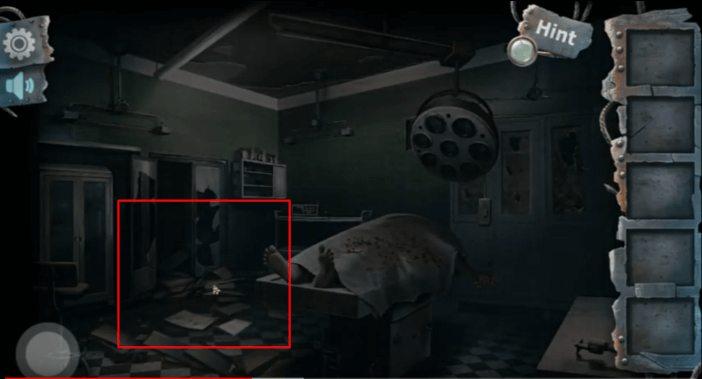
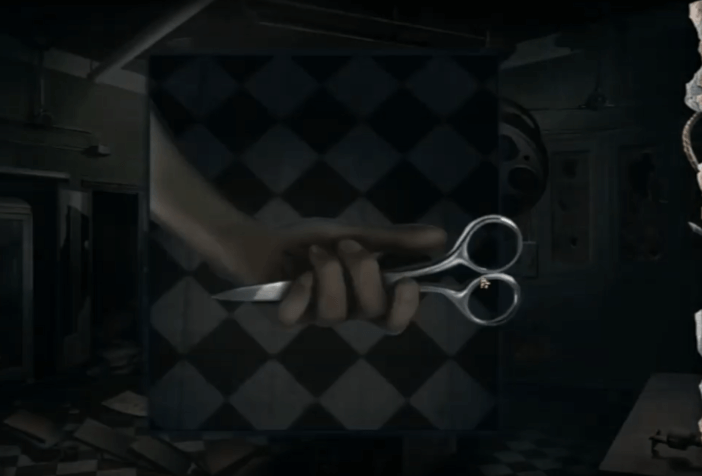
You can start by clearing out the papers and rumamge through what fell out of the locker with the broken glass, behind the table with the dead body. There you’ll find a few important messages that will give you hints for later. Also, tap on the dead body’s hand and pick up the scizors.
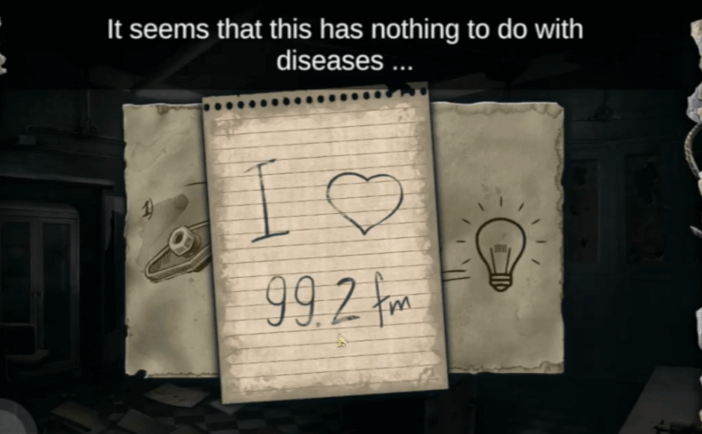
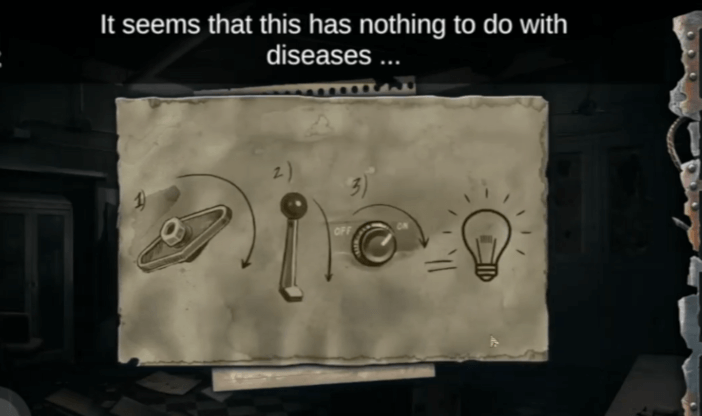
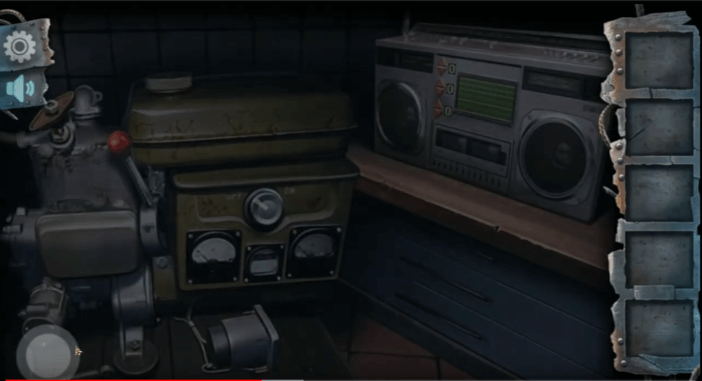
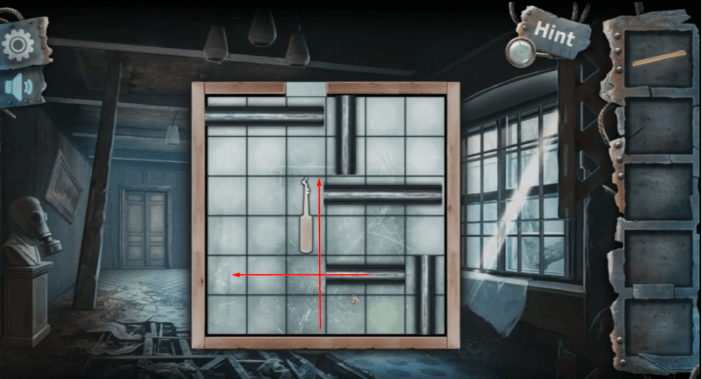
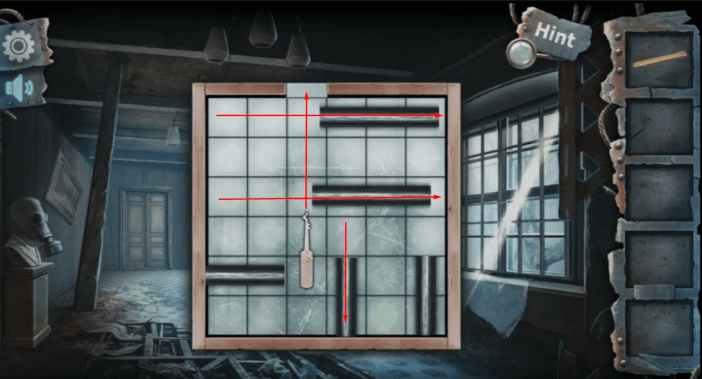
Now, go to the other part of the room, with the hospital curtains, and use the scizors to cut through the bandages preventing you to move them apart and pass through. This will allow you to go to the mini room behind the curtains, with a radio and a few other devices. Obviously the FM station clue is to be used on the radio, while the other instructions displayed on previous screenshots are for the other devices here.

To turn the power on for the radio, you must do the following:
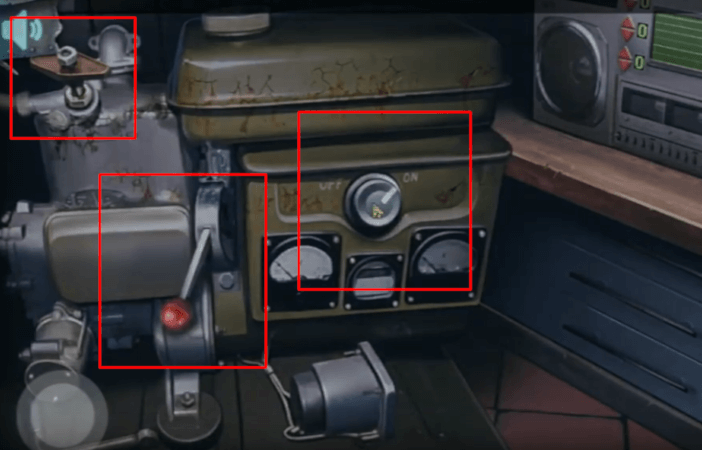
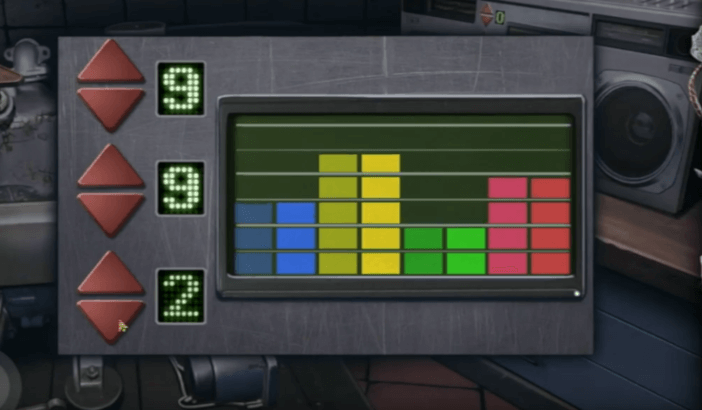
This will enable you to operate the radio and once you tap it, set the stations as follows, which will synchronize the noise and give you a clue for how to use colors in the next puzzle:
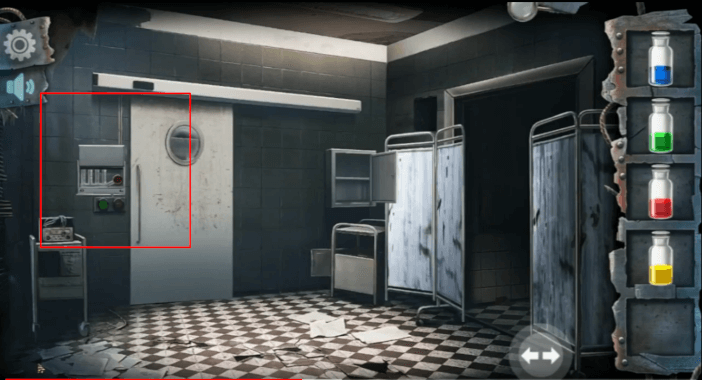
You should leave that for now and pick up a few more things before you can use it. You will notice that the power for the whole room is back on and now you have lighting. The lights turned on above the dead body are a clue for you to open the locker with chemicals, located next to one of the doors.
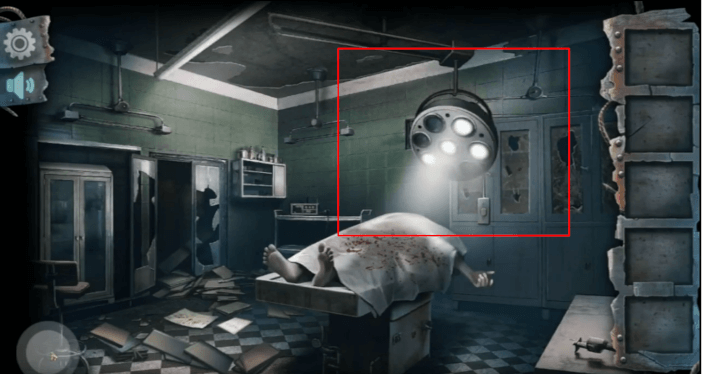
Now, switch to the other part of the room and tap on the locker next to the door and the previously cut curtains, and tap the exact same circles that are shining a light above the dead body.
This will open the box and you will loot 4 jars of differently colored chemicals. They are to be used for the puzzle next to the door, to which the locker wit hthe chemicals was located. The clue for the exact proportion of the chemicals was given on the synchronized radio and the correct combination is as follows:
This will open the door to the next room.
Room 5
This next room (room 5) only has one room view, no split parts, but it does have some additional space to go through. It also does not have too many details and no scary, grotesque elements, apart from the blood stain on the floor. As soon as you enter, pick up the oil doser and the surgeon’s tool on the table, located on the right. Also, pick up the cog, stuck on the doors on the opposite side of the room.
Also, be careful when you tap on the dark room visible through the opened door on your left…
After surviving that heart attack, tap on the small room in the back on your right, with the light coming out. It contains another body, lying on an operating table, with some moor tools for you to gather around it.
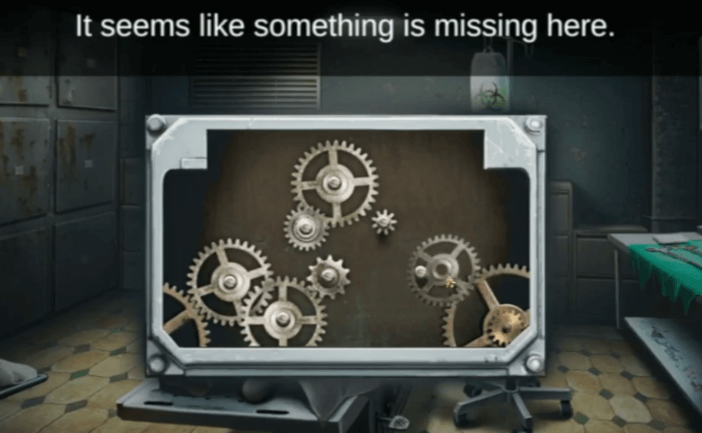
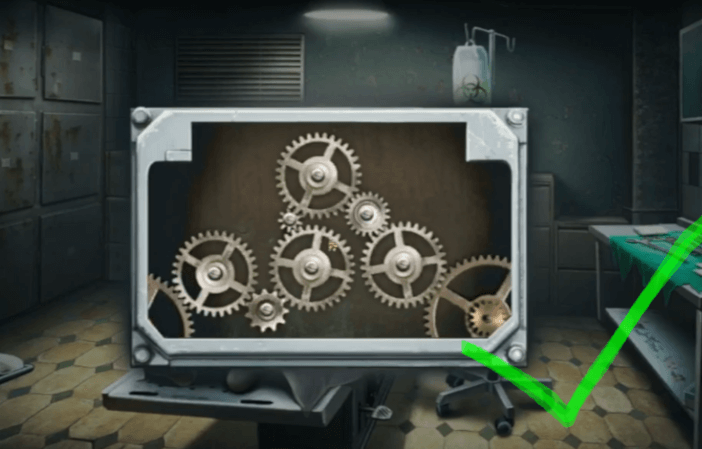
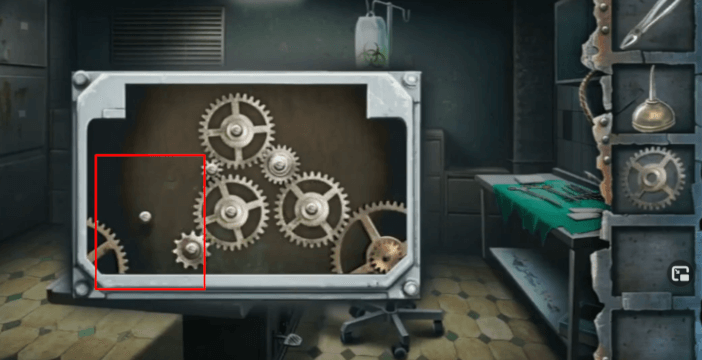
Firstly, tap on the operating table’s mechanism, in its basis, which will bring up the cogs. Obviously, the cog you found at the door is to be placed in the place where its missing. But, the cogs also need to be rearanged in the correct order to work. The correct way is as follows:
This will allow you to lift the body high enough so that the IV can reach it. Just tap on the peddle, and then on the needle from the IV. You will need to get a clue for the correct dosage from the other puzzle, so leave this for now. But, before you do, open up the cog mechanism again and take your cog out. This is one of the rare opportunities where a single tool can be used multiple times.
Now get back to the man room view and tap on the CO2 cannisters in the far-left corner. Tap on the oil and on the valves to oil them up and make them usable.


Once oiled, the valves are to be turned by using the surgical clams you picked up from the table, which will be available to be used on both valves and then expended, but you won’t need them anymore.
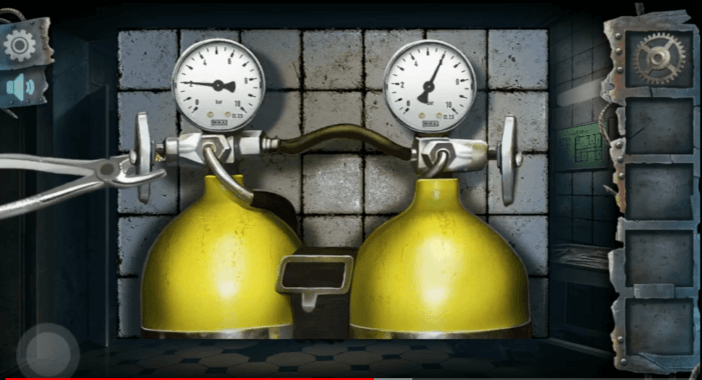
Once you activate the valves on the CO2 tanks, the pressure indicators will display specific values. The left one will display 4 and the right one will display 6, which is a clue for the IV setting. So, go back to the body and tap on the IV console, and set 4 and 6 respectivaly, like this:
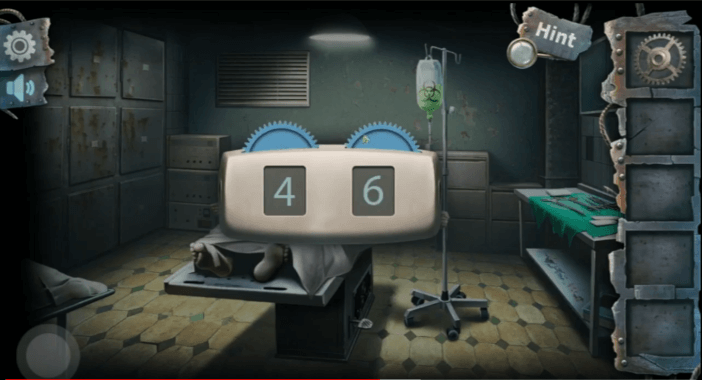
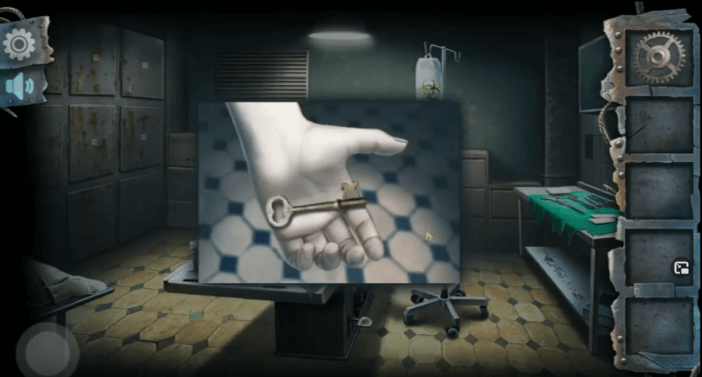
The body’s hand will relax and the hand will open, revealing a key. Loot the key. It is for the iron doors on the opposite wall, the one you got the cog off of. But, to open it, you also need to put the cog back in place. This will open the lock puzzle:
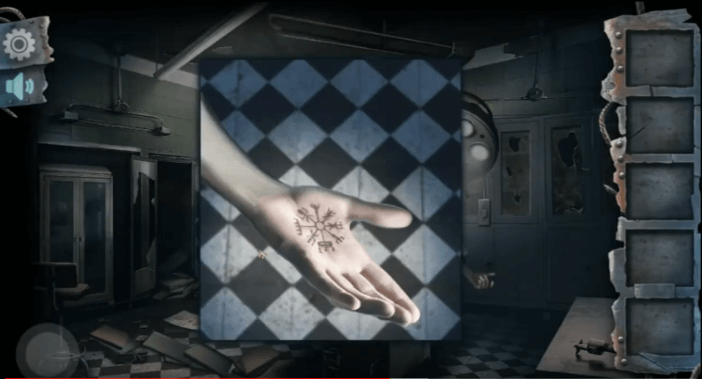
The lock puzzle may look intricate and complicated, but there is a clear clue on the palm of the hand from which you took the key for the previous lock from the dead guy in room #5. The one with the lights broken above it. If you go there now, the hand will have an inscription of the combination:
Room 6
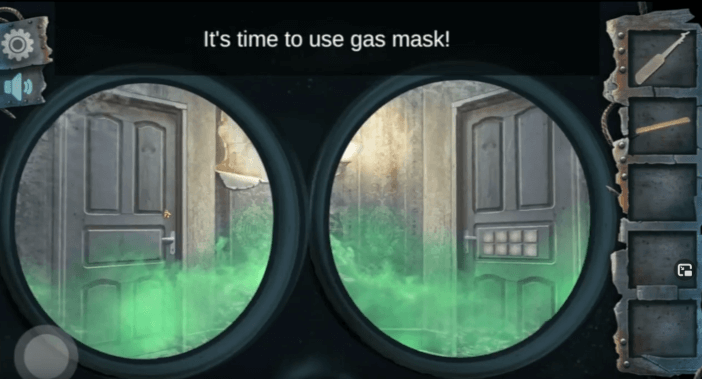
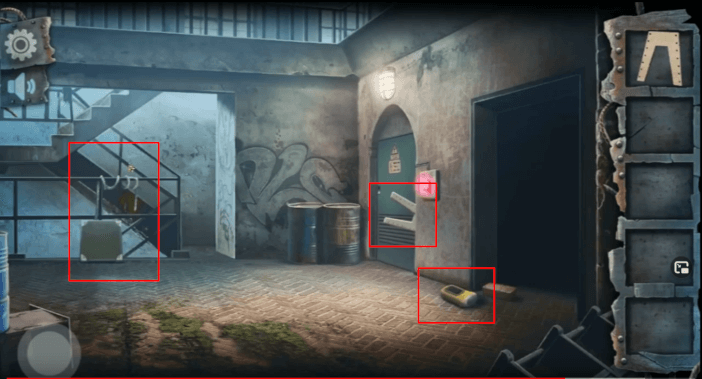
This entire room 6 is one big and wide hallway, but there are doors that lead to two additional rooms, and there is a corridor in-between filled with poisonous gas. When you first arrive, you can immediately grab a couple of useful items, which includes a wooden handle and a gas mask. You can also grab a lockpick from a puzzle on a window located directly opposite where you stand.
The puzzle may take you a little while but it is a simple one.
After you have your lockpick, put on the gasmask go through the door to the gas corridor. If you looted the gasmask, it will be used automatically and expended after that one use, but it’s ok you will always have it when you go through the corridor.
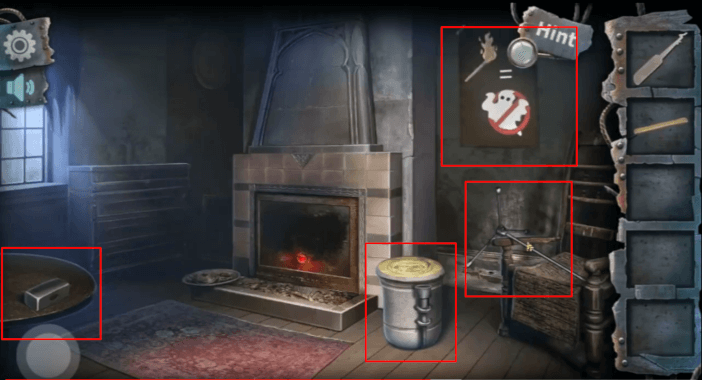
Tap on the room on the left first as you will find many usefull items there. It’s the one with the fireplace. You can loot a tripod, some paper from the wall, a metal tube, and even a hammer head. You combine the wooden handle and the hammer head by tapping the head and drag&drop it on the handle
Now go back to the corridor with the windows and use the assembled hammer to knock down the large wooden pillar next to the statue. After you knock down the pillar, tap on the ceeling where the pilalr was touching it and a ladder will appear. Use the lockpick to open the ceeling hatch. When you go up there, you will find a very peculiar scene.
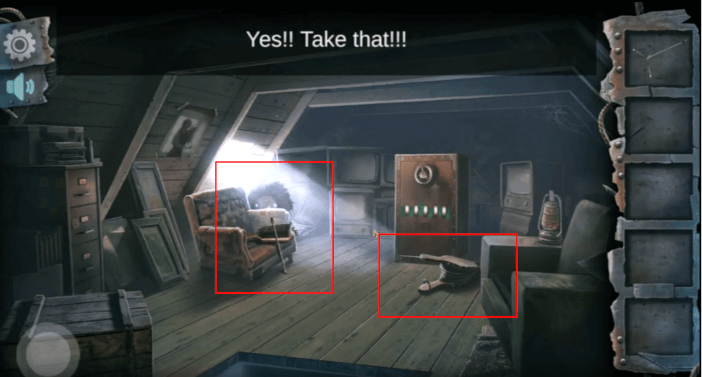
Before the creature jumps you, you have time to grab the magnifying glass, lying on the wooden box in the bottom left corner of the screen. After you grab it, just go back down. The magnifying glass is to be used on the strongest Sun beam, coming through the cloasest window on your right. Place the paper on the window sims and use the glass to burn it.
When the fire gets going, loot the burning paper and combine it with the torch handle by drag&droping it. Then go back up the ladder and use the burning torch on the monster. This will scare it for long enough for you to loot the top mart of the microphone tripod, on the armchair. Also loot the brush on that same armchair, and the air paddle on the opposite side, marked on the photo above.
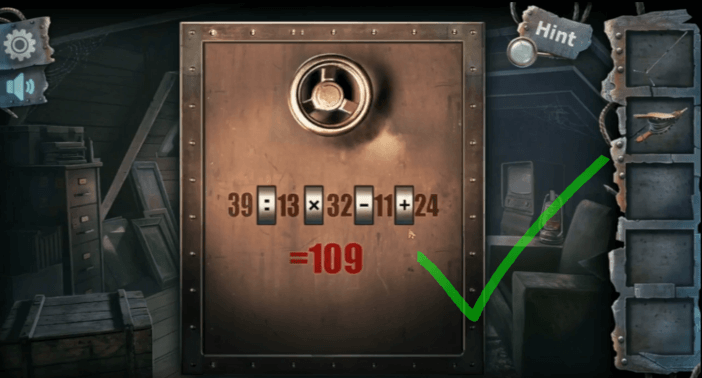
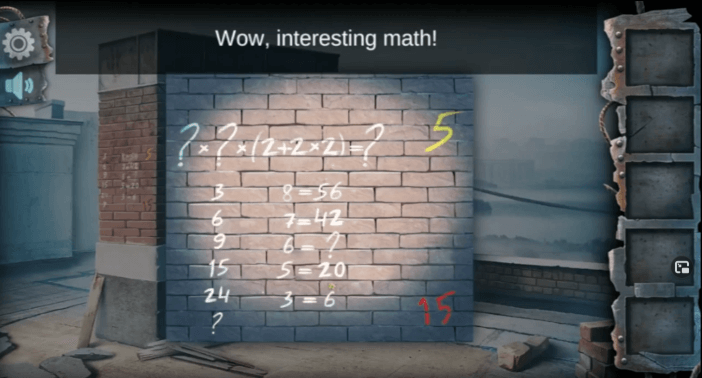
Combine the two tripod parts immediately, while the brush is to be used to clean off the safe combination hints, located directly on the opposite side of you, in this very room. The correct equasion is as follows:
Loot the microphone in the safe and combine it with the assembled tripod and place it in the corridor room, next to the windows. The shadow will give you the puzzle clue to open the third room in thise level. Then go to the corridor with gass and to the room on the left to find the second part of the combination in the room with the fireplace.
Then enter both combinations in the door’s puzzle lock.
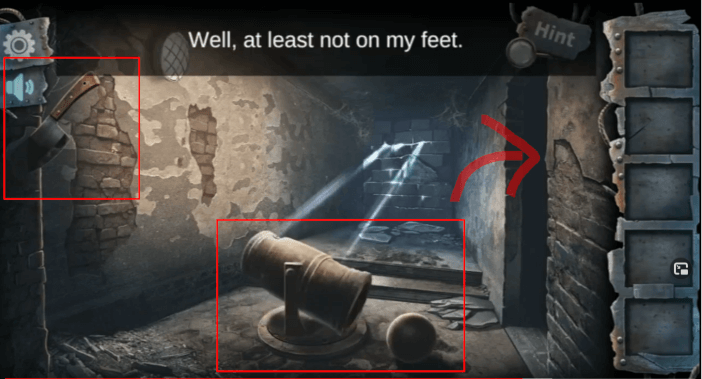
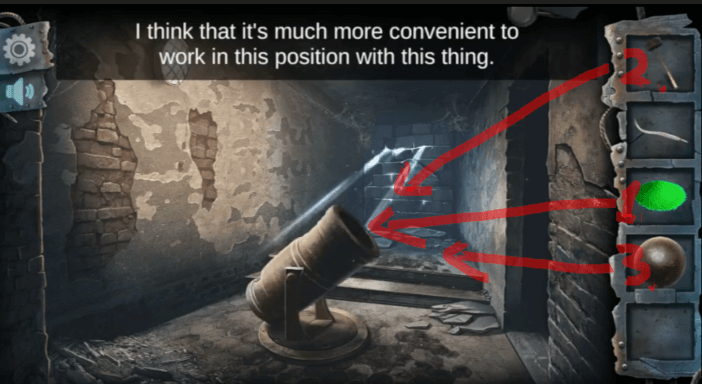
You will then find yourself in a room with a cannon, pointed at a wall with holes and some other details around. Tap the pin in the base of the cannon to remove it and then tap the base again to rotate the cannon. This will cause the cannonball to fall out and you can loot it. Also, loot the meat cleaver stuck in the wall on the left and then tap to go to the room on the right side.

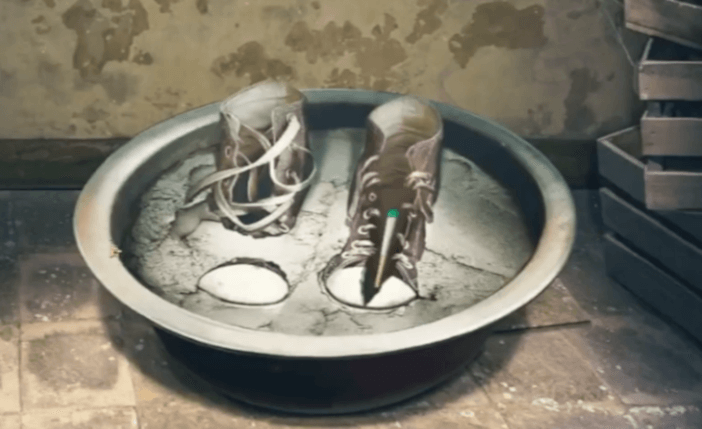
You will then find yourself infront of some snickers in water. Loot the shoelace and the hammer, and then use the meat cleaver to split open the left snicker. It will reveal fire matches. The cleaver wont be expended and you can combine it with the matches to get gun poweder (sulfur). Go back to the cannon and put the powder in, then use the hammer to tuck it in. After that you put the cannon ball back in
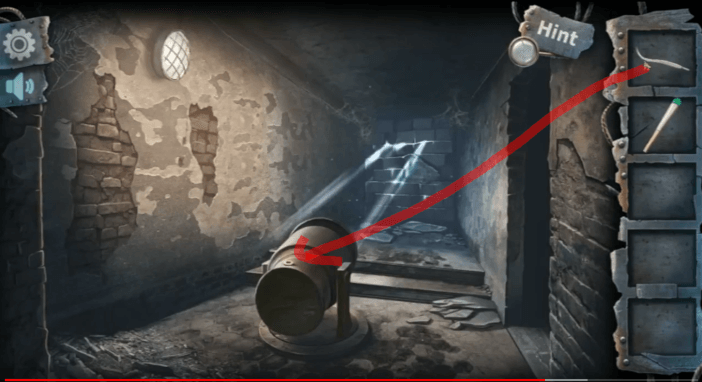
After this, turn the cannon toward the wall opposite of you, the one with the light coming through the holes, and fire up the cannon with that one match left in the sneaker. Put the shoelace in that little hole on the canon where the fuse goes and then light it with the match.
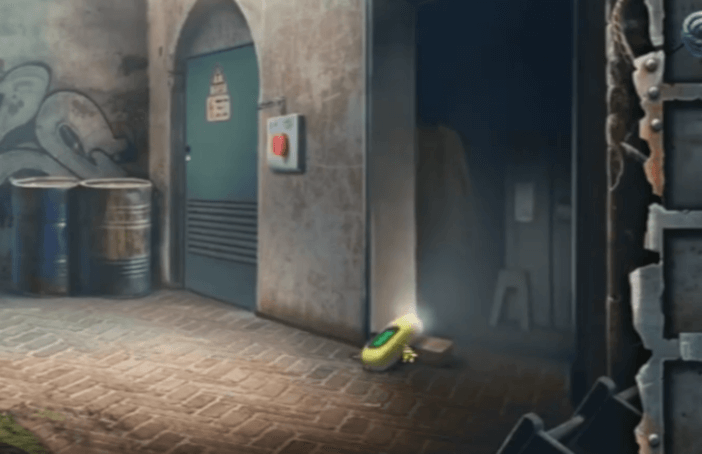
Room 7
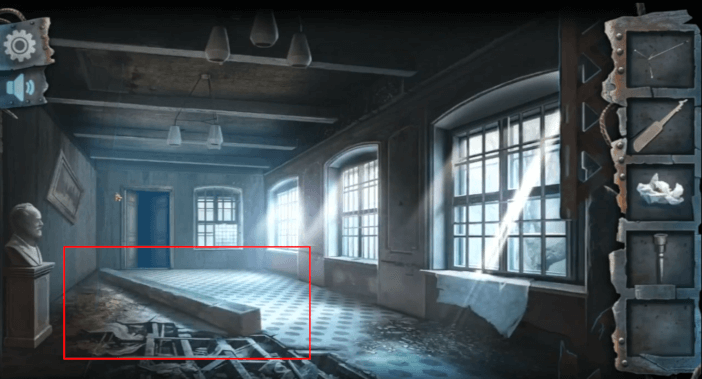
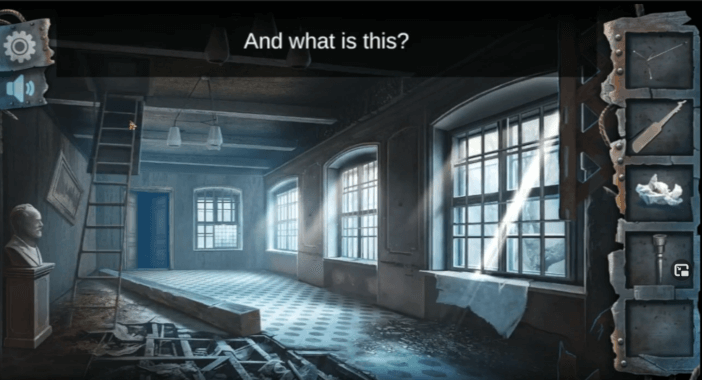
The hall with the moving metal bars is just for effect and atmosphere and you only need to wait it out. After it has passed, the doors behind will open and you can proceede into the next room, which is our room #7. It has several smaller sections and you can immediately pick up some tools, as marked bellow:
You can combine the chair seat with the two pairs of legs immediately, while you should use the glass to cut the wiring above the red light bulb. Also, go back to the previous section and put the solar flashlight on the window crack, so it can charge up.
The charged flashlight is for the dark corner, so place it on the brick and it will light up that small compartment, where you will find more stuff.
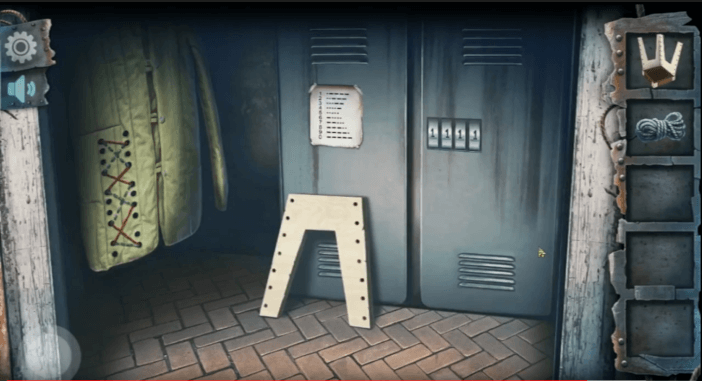
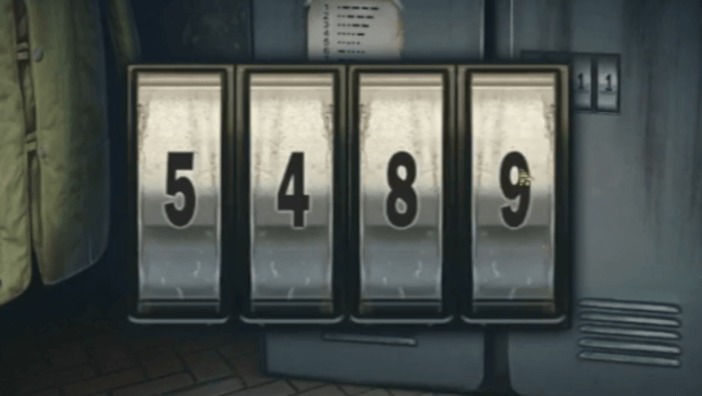
Use the third pair of legs and combine it with the chair (at this stage you only lack one more and the chair will be complete) and use this combination on the locekr door:
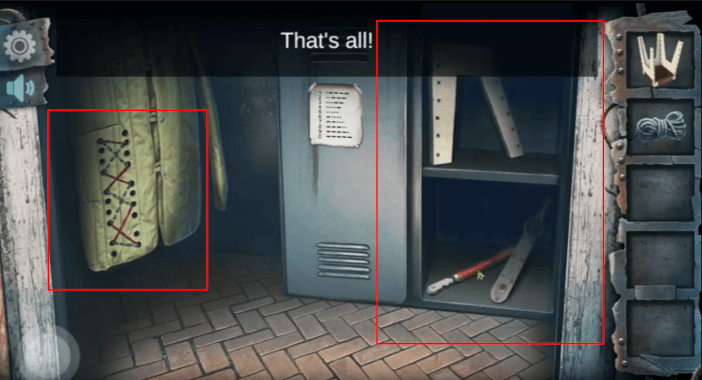
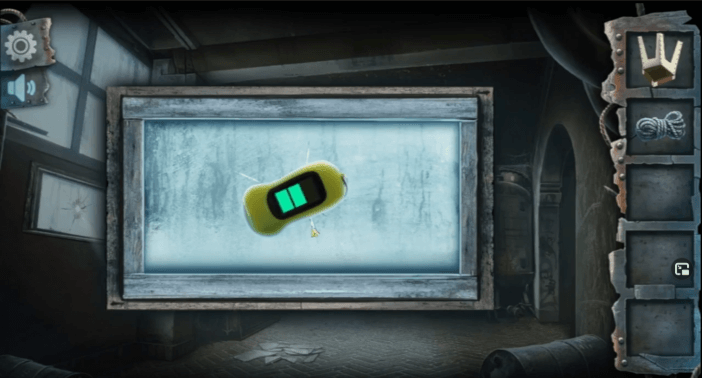
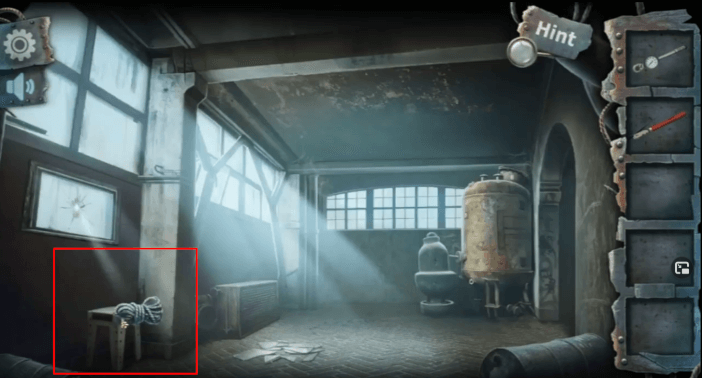
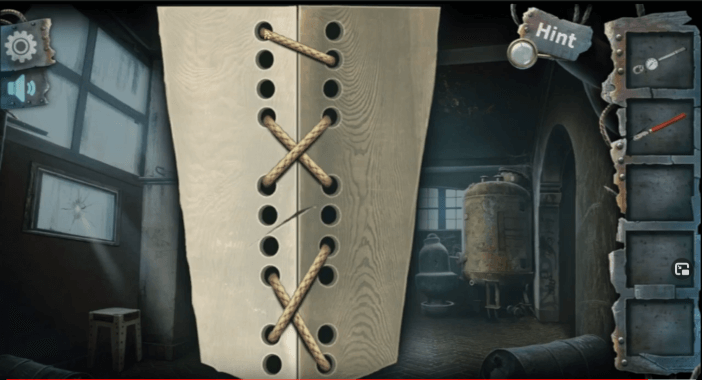
Pick up the final part for the chair, along with the glasscutter and the scale-thingy tool. Now, go to the screen with the hole in the window, and place the chair underneath it. You will need to first strengthen the chair, before you can stand on it. For this, use the rope, while the pattern can be found on the jacket in the dark corner you shone a light on.
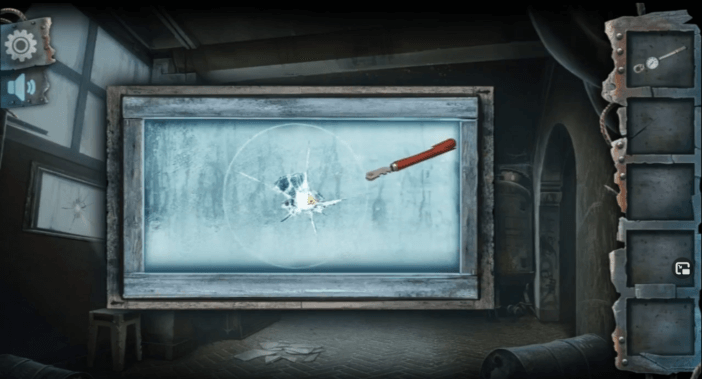
Now, you can safely climb the stool and use the glasscutter on the window. After that ,just tap the hole and you will go to the roof, the final room
Room 8
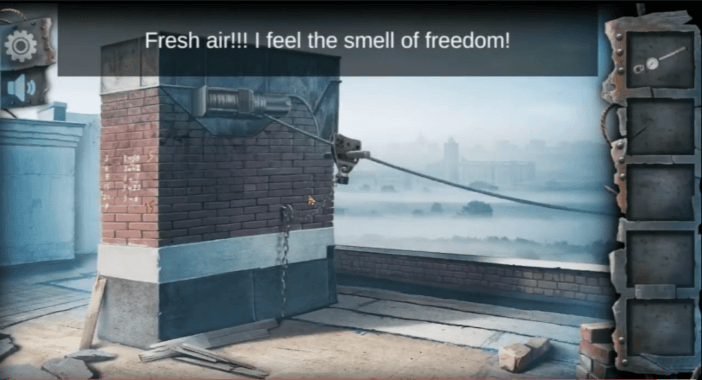
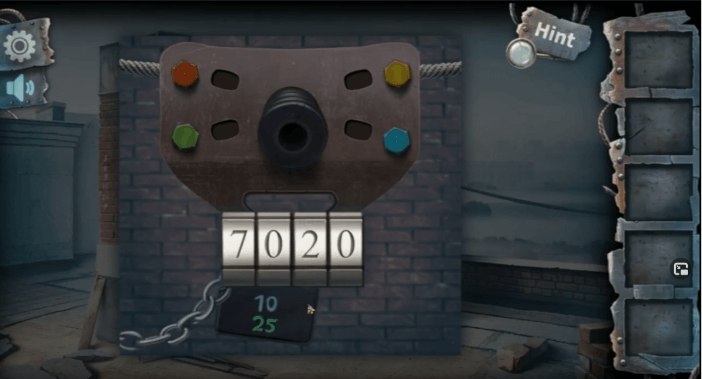
This is our final room, the roof, and it only has a single puzzle. You need to unlock the handles for the zip line, whith which you will zip down to freedowm. But, the lock has two separate mechanisms for unlocking. First, you must turn every screw to the correct value on this tool you are using, as shown below:
Orange: 15
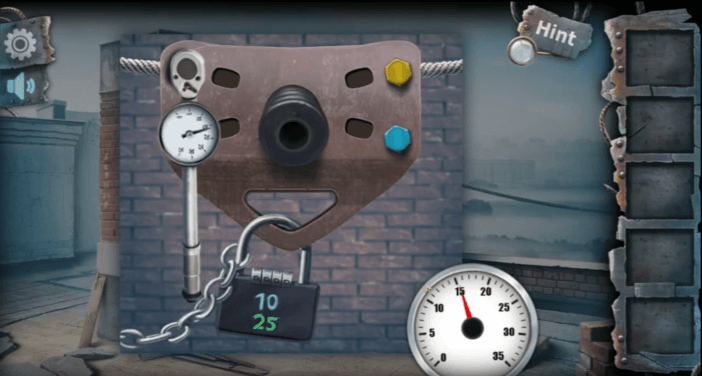
Yellow: 5
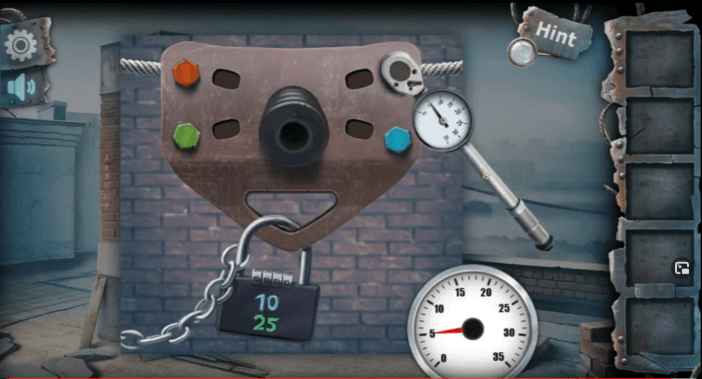
Green: 25
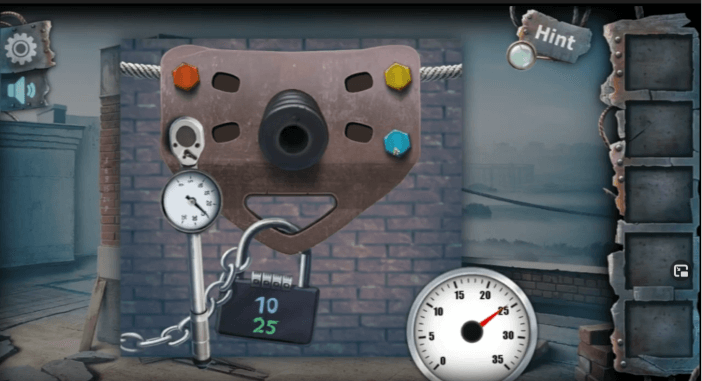
Blue: 10
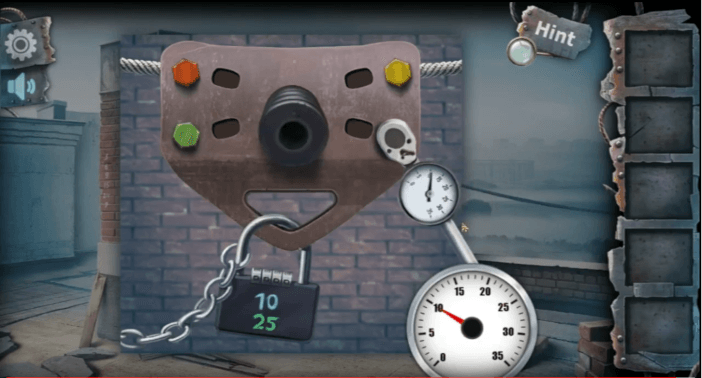
That fixes the zip line handle, but it is still locked with a chan to the brick wall. To find the right combination for the lock, tap on the wall’s side:
This is the right combo and after you’ve unlocked, you are home free!

Ziplining to freedom… What a cool concept. This is it as far as Scary Horror Escape goes. The game is not that long compared to some others of the escape genre, but it sure does have some interesting solutions and puzzles it presents to the player. I’ve definitely enjoyed them all!